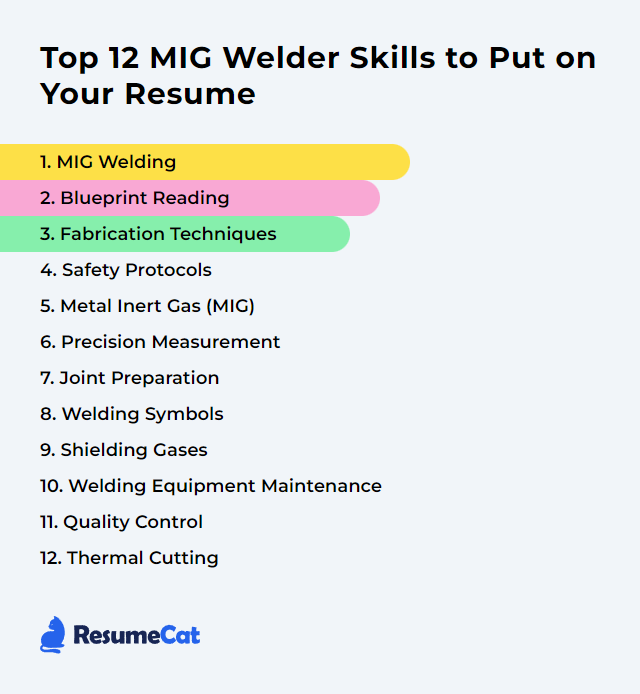
Top 12 MIG Welder Skills to Put on Your Resume
In today's job market, a strong MIG welder resume doesn’t just list tools. It tells a story about precision, safety, speed, and clean beads that hold up under pressure. The skills below signal you can read a print, dial in a machine, and deliver consistent results on schedule.
MIG Welder Skills
- MIG Welding
- Blueprint Reading
- Fabrication Techniques
- Safety Protocols
- Metal Inert Gas (MIG)
- Precision Measurement
- Joint Preparation
- Welding Symbols
- Shielding Gases
- Welding Equipment Maintenance
- Quality Control
- Thermal Cutting
1. MIG Welding
MIG welding (often referred to as GMAW) uses a continuously fed wire and shielding gas to create a stable arc and a clean, efficient weld. It’s fast. It’s repeatable. It performs across common materials and thicknesses when set up right.
Why It's Important
Shops rely on MIG for production throughput and dependable strength. From automotive to structural fab, it balances speed with quality while keeping post-weld cleanup reasonable.
How to Improve MIG Welding Skills
Nail the fundamentals, then fine-tune. A few high-impact moves:
Dial in voltage and wire feed: Match settings to material thickness and position. Listen for a smooth, steady sizzle rather than popping or sputtering.
Pick the right wire and gas: ER70S-6 on mild steel with 75/25 (Ar/CO2) is a proven combo. Switch wire and gas to fit the base metal, not the other way around.
Control angle and stick-out: About 10–20 degrees push, with 3/8–1/2 inch stick-out on steel, keeps the arc stable and the bead tidy.
Prep like it matters: Grind, de-scale, and degrease. Clean metal gives better fusion and fewer defects. Every time.
Maintain your gear: Keep liners, contact tips, and nozzles in good shape. Poor consumables wreck otherwise good technique.
Practice with intent: Vary travel speed, weave, and parameters on scrap. Read the bead, adjust, repeat.
Do this consistently and your welds tighten up—stronger, smoother, repeatable.
How to Display MIG Welding Skills on Your Resume
2. Blueprint Reading
Blueprint reading means translating drawings into real-world parts: dimensions, tolerances, materials, weld symbols, and notes. It’s the bridge from design to fit-up to final inspection.
Why It's Important
Misread a symbol and you’ll miss a requirement. Accurate interpretation ensures the right joint prep, correct weld size, and assemblies that actually fit together.
How to Improve Blueprint Reading Skills
Build fluency piece by piece:
Master symbols and notation: Fillet, groove, contour, finish, tail data—know what each callout demands.
Study real prints: Review a range of drawings across thicknesses and joint types. Speed comes with repetition.
Trace the workflow: From print to WPS to fit-up to inspection criteria. See how each step connects.
Measure against the drawing: Verify parts throughout fabrication, not just at the end.
Ask targeted questions: Clarify ambiguous notes early to avoid rework later.
With practice, symbols stop being marks on paper and start feeling like instructions you can hear.
How to Display Blueprint Reading Skills on Your Resume
3. Fabrication Techniques
In practice, MIG (GMAW) fabrication spans layout, cutting, fit-up, tacking, welding, and finishing. MIG/MAG processes adapt well to jigs, fixtures, and production cells, handling thin sheet to plate with the right parameters.
Why It's Important
Good fab technique turns a decent weld into a great assembly. Strong joints, minimal distortion, clean alignment—this is where schedules are met and scrap stays low.
How to Improve Fabrication Techniques Skills
Small tweaks, big payoff:
Know your machine: Understand arc control features, inductance, and any pulsed programs available.
Prep and fixturing: Tight, consistent fit-up with proper root openings. Clamp smartly to control movement.
Choose technique purposefully: Push for appearance and lower penetration; pull for deeper fusion. Adjust by material and position.
Manage heat: Stagger welds, use back-step sequences, and cool between passes to tame distortion.
Match wire and gas to the job: Mild steel, stainless, aluminum—each has its own best pairings.
Finish clean: Remove spatter, blend edges, and hit spec without overgrinding.
Efficient fabrication looks calm from the outside. Under the hood, it’s planning and discipline.
How to Display Fabrication Techniques Skills on Your Resume
4. Safety Protocols
Safety for MIG welding covers PPE, ventilation and fume control, electrical checks, fire prevention, and sound ergonomics. It’s not paperwork—it's how you go home healthy.
Why It's Important
Arc radiation, fumes, hot metal, moving wire, energized parts. One lapse can spiral. Rigorous safety keeps people protected and production steady.
How to Improve Safety Protocols Skills
Make it muscle memory:
Train thoroughly: Process hazards, arc flash, fume risks (especially hex chrome on stainless), and emergency response.
Wear the right PPE: Proper shade helmet, flame-resistant clothing, leather gloves, safety glasses, hearing protection, and respirator when required.
Ventilate well: Fume extraction at the source. Position yourself to avoid plume breathing.
Maintain equipment: Inspect cables, gun, connections, and gas hoses. Replace damaged parts immediately.
Prevent fires: Clear combustibles, use fire blankets/screens, keep extinguishers close, follow hot-work rules like NFPA 51B.
Electrical and LOTO: De-energize and lockout before servicing. Respect power, every time.
Document and drill: Report near misses, practice evacuations, and keep first-aid supplies stocked.
Safe shops aren’t lucky. They’re consistent.
How to Display Safety Protocols Skills on Your Resume
5. Metal Inert Gas (MIG)
Also known as GMAW, “MIG” commonly describes wire-fed welding with shielding gas. In steel work, gases often contain active components (like CO2), so many pros say MIG/MAG. What matters: understanding transfer modes, shielding strategies, and arc behavior.
Why It's Important
Speed and versatility are great, but control is everything. Pick the right transfer mode and gas mix, and your welds become cleaner, stronger, and faster with less rework.
How to Improve Metal Inert Gas (MIG) Skills
Level up with intent:
Master transfer modes: Short-circuit for thin stock and out-of-position, spray for flat/horz and productivity, pulsed spray for control and reduced spatter.
Match wire to base metal: Choose alloy and diameter for required penetration and deposition rates.
Tune gas mix: Mild steel runs well on 75/25 or 90/10 Ar/CO2; stainless may call for tri-mix; aluminum prefers straight argon (or Ar/He on thick sections).
Stabilize the arc: Consistent stick-out, steady travel speed, and solid work clamp placement.
Keep consumables fresh: Swap worn tips, clean nozzles, and check liners to prevent feeding hiccups.
When the arc behaves, everything else flows.
How to Display Metal Inert Gas (MIG) Skills on Your Resume
6. Precision Measurement
Precision measurement means checking parts and weldments with accuracy—calipers, micrometers, tapes, squares, height gauges, feeler gauges, weld gauges, and indicators—to hit specified dimensions and tolerances.
Why It's Important
Good welds in the wrong place still fail inspection. Tight measurement keeps assemblies square, holes aligned, and clearances within spec.
How to Improve Precision Measurement Skills
Measure twice, weld once:
Use the right tool: Match gauges to the task—fillet weld gauges for leg size, feelers for root gaps, micrometers for tight tolerances.
Calibrate and care: Keep tools clean, calibrated, and stored properly to maintain accuracy.
Control the environment: Heat grows metal. Measure at consistent temps and after parts cool when specs demand it.
Build routines: Verify critical dimensions at setup, mid-process, and final.
Record results: Simple checklists catch drift before it becomes rework.
Precision isn’t flashy. It saves hours.
How to Display Precision Measurement Skills on Your Resume
7. Joint Preparation
Joint prep covers cleaning, beveling, fit-up, and alignment for the chosen joint type—butt, lap, corner, edge, or tee. It sets the stage for penetration, fusion, and appearance.
Why It's Important
Well-prepped joints weld easier and fail less. Poor prep invites porosity, lack of fusion, distortion, and ugly repair work.
How to Improve Joint Preparation Skills
Do the unglamorous work up front:
Clean thoroughly: Remove mill scale, rust, paint, and oil. Bright metal wins.
Choose the right design: Bevel angles, root face, and root gap should match thickness and process.
Cut accurately: Straight, square edges fit tight and reduce heat input.
Bevel for thickness: On heavier plate, 30–45° combined bevels improve penetration.
Select wire and gas appropriately: Pair to material and position for cleaner roots and caps.
Set correct parameters: Voltage, WFS, and travel speed tuned to the joint. Don’t chase defects with brute heat.
Clamp and check: Hold alignment and gap evenly. Verify with gauges before striking an arc.
Tack smart: Frequent, balanced tacks control movement. Grind out any bad tacks before welding.
Prep well, weld once.
How to Display Joint Preparation Skills on Your Resume
8. Welding Symbols
Welding symbols compress a lot of information—process, size, length, contour, finish—into clear marks on a reference line and arrow. They tell you what to do and where to do it.
Why It's Important
Symbols standardize communication. They eliminate guesswork and keep welds on spec across teams and shifts.
How to Improve Welding Symbols Skills
Turn symbols into action:
Learn the core elements: Reference line, arrow, tail, and supplemental symbols.
Connect to practice: Read a symbol, sketch the joint, identify prep and parameters you’ll need.
Focus on MIG details: Fillet size, groove dimensions, intermittent patterns, and finish notes tied to GMAW procedures.
Check against acceptance criteria: Know what a compliant fillet or groove looks like before you weld it.
Repetition: Review mixed symbol sets until recognition is near-instant.
Fluency here speeds everything downstream.
How to Display Welding Symbols Skills on Your Resume
9. Shielding Gases
Shielding gases protect the molten weld pool from oxygen and nitrogen, stabilizing the arc and shaping bead profile. The mix changes penetration, spatter, and appearance.
Why It's Important
Wrong gas, wrong result. With the right mixture and flow, porosity drops, puddle control improves, and cleanup shrinks.
How to Improve Shielding Gases Skills
Refine your choices and your coverage:
Know the options: Argon for non-ferrous; CO2 for deep penetration on steel with more spatter; blends like 75/25 or 90/10 for balanced steel performance; tri-mix for stainless; Ar/He for thick aluminum.
Set proper flow: Typically 20–30 CFH (about 10–14 L/min). Too low invites porosity; too high creates turbulence and air entrainment.
Match nozzle and stick-out: Larger nozzles and correct stick-out improve shielding in drafty spots.
Control the environment: Block drafts and keep the nozzle clean. Spatter build-up ruins coverage.
Good gas coverage is invisible—until it isn’t. Get it right and defects vanish.
How to Display Shielding Gases Skills on Your Resume
10. Welding Equipment Maintenance
Maintenance means keeping the power source, wire feeder, gun, cables, and gas system in peak shape. Smooth feeding and stable arcs depend on it.
Why It's Important
Poorly maintained gear wastes time and wire. Consistent upkeep improves weld quality, uptime, and safety.
How to Improve Welding Equipment Maintenance Skills
Build a simple routine and stick to it:
Inspect daily: Look for frayed cables, loose connections, kinked liners, gas leaks, and worn consumables.
Clean after shifts: Clear spatter from nozzles, replace clogged tips, and blow out feeders.
Mind the drive rolls: Use the right type (V-groove for solid wire, knurled for flux-cored) and set tension correctly.
Protect wire: Keep spools dry and covered. Contaminated wire feeds poorly and welds worse.
Check gas delivery: Verify flow at the gun and test for leaks. Stable shielding starts here.
Service on schedule: Periodic internal checks, firmware updates when applicable, and calibration as needed.
Fix small issues early and big problems rarely appear.
How to Display Welding Equipment Maintenance Skills on Your Resume
11. Quality Control
Quality control spans procedure adherence, in-process checks, and final inspection—visual and, when required, nondestructive testing. It proves your welds meet spec.
Why It's Important
QC prevents rework, protects schedules, and keeps structures safe. It’s the difference between “looks fine” and “passes every time.”
How to Improve Quality Control Skills
Make quality systematic:
Follow the WPS: Use approved parameters, gases, and techniques. Document heat input where required.
Inspect as you go: Root passes, interpass cleaning, and tie-ins get a visual check before covering up.
Control variables: Preheat when specified, monitor interpass temperature, and maintain consistent travel speed.
Use the right tools: Weld gauges for fillets and grooves, straightedges, and levels. Record readings.
Apply NDT when needed: PT/MT for surface cracks, UT/RT for internal flaws—coordinated with qualified personnel.
Close the loop: Capture defects, find root causes, and update procedures or training to prevent repeats.
Consistency is king. Documented consistency is unbeatable.
How to Display Quality Control Skills on Your Resume
12. Thermal Cutting
Thermal cutting uses heat to separate metal—most commonly oxy-fuel, plasma, or laser systems. While MIG welders join metal, thermal cutters shape and prep it for welding.
Why It's Important
Accurate cuts mean better fit-up, faster welding, less distortion, and fewer hours grinding parts into submission.
How to Improve Thermal Cutting Skills
Whether plasma or oxy-fuel, focus on control:
Choose the right process: Plasma for speed and versatility; oxy-fuel for thick carbon steel and beveling; laser when precision rules.
Use proper consumables: Match tips, electrodes, and nozzles to amperage and thickness. Replace at the first sign of degraded edges.
Set travel speed and height: Correct standoff and steady speed produce straight kerfs and minimal dross.
Prep and preheat (oxy-fuel): Preheat thick plate properly. Keep flame neutral, not oxidizing.
Mind piercing technique: Pierce off the line and move into the cut for cleaner edges and longer consumable life.
Control distortion: Sequence cuts to spread heat, and let parts cool when tolerances are tight.
Clean edges in, clean welds out. That’s the game.
How to Display Thermal Cutting Skills on Your Resume